evenito allows you to customise the design, structure, language and sender information of each message. The following article shows you how to customise your message accordingly.
In this article:
Edit messages
Search in the message overview for the message you want to edit. If you hover the mouse over the desired message, the actions for sending and statistics will be displayed on the right side.
To open and edit the message, click on it.
Sender information
Edit the general message settings and add the sender information by selecting the gear wheel in the upper right corner.

Message settings
- Type: Choose a message type.
- Recipients: Based on the defined groups you can determine the recipient group(s)
- Sender name
- Sender e-mail
- Subject (visible to participant)
- Name: Name of the message in the message overview (this will only be displayed to you)
- Reply to e-mail (optional): Define a reply e-mail address, which will be written to automatically as soon as the contact replies to the e-mail. If none is stored, the sender e-mail address is automatically selected.
- CC e-mail address (optional)
- BCC e-mail address (optional)
Please note:
For the fields sender name, sender e-mail, subject and reply e-mail you can also use a placeholder. Just click on this icon ![]() next to the field.
next to the field.
In addition, several e-mail addresses or placeholders can be used in the CC and BCC fields. If several e-mail addresses are used, they must then be separated by a comma and a space (e.g. first@email.com, second@email.com, third@email.com).
Don't forget to save all changes with the "Save & close" button in the upper right corner.
Set up multilingual messages
You are planning a multilingual event and have already selected the language(s) English, French or Italian in addition to German in the basic setup?
Left of the "Send test e-mail" button you will find the language switcher. Click on it and select the individual languages in order to switch back and forth between the individual templates and to store the content as well as the subject, sender and sender name in the respective language.
The symbol ![]() shows you whether you have correctly stored content in all languages. Red symbolises that adjustments are still necessary, green means that all content in all languages has been stored.
shows you whether you have correctly stored content in all languages. Red symbolises that adjustments are still necessary, green means that all content in all languages has been stored.

Please note:
If you have set up your message in one language and want to transfer the design to another language, simply click on the three dot icon (top right) and select "copy from another language". This way, for example, your German message will also be displayed in English and you only have to change the texts.
E-Mail editor structure
Below we will show you how the editor is structured and how you can deposit your desired design and the corresponding content.
Settings
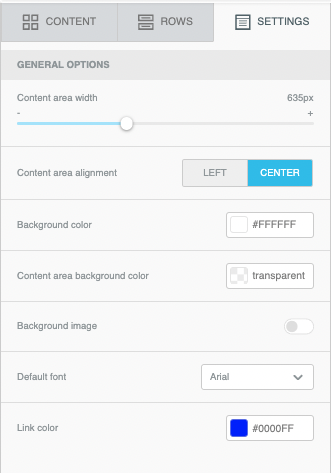
In this tab you define the basic settings for the width of the e-mail body, the background colour of the content and the fill area, as well as the default font and associated font and link color.

Row
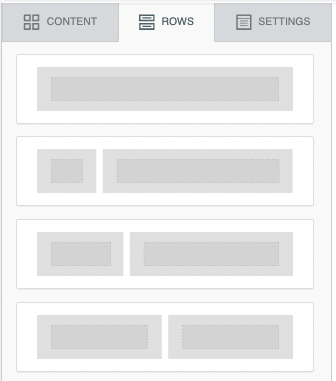
The lines determine the structure of the message. They define the horizontal composition of a section.
A row can contain one to six columns. Using multiple columns allows you to place different content elements next to each other at the same time.
Each row has its own settings. This gives you flexibility in designing your message. For example, you can define the background color of a whole row, content or a specific column independently.
You can insert the row at the desired place in the message via drag & drop.

Content
After you have defined the general settings, such as the width of the email body and the colors, and built your structure using the lines, you need to fill them with content. You can also insert the content into the predefined lines via drag & drop.
The following contents are available:
- Title
- Paragraph
- List
- Image
- Button
- Table
- Divider
- Spacer
- Social Media Icons
- Video
- Icons
- Menu
- Text
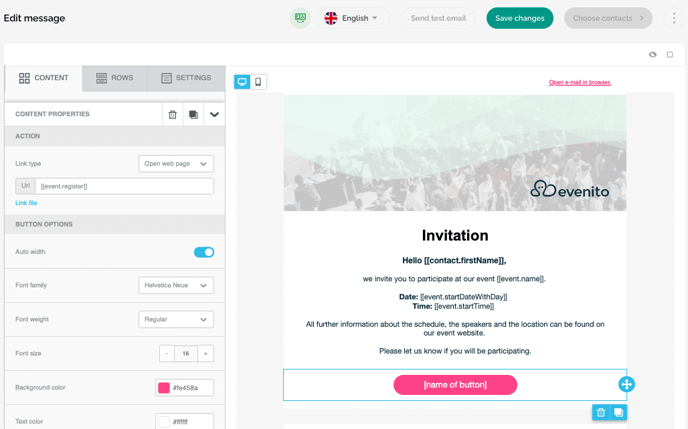
Each content has its own functions and settings, which open by clicking on the content in the window on the left.

Please note:
If you set up your message in different languages, don't forget to adjust the content for each language. The icon ![]() next to the language shows if the content is already stored for all languages (green: all saved, red: translations missing).
next to the language shows if the content is already stored for all languages (green: all saved, red: translations missing).
You want to copy the layout for your other language? In the article Copy e-mail template of a language we show you how to do that.
Adjust structure or content
Once the structure is in place, you can fill it with your content (e.g. upload images, insert texts, set colour and font, etc.).
Move rows and content
If you hover over the row or content field in the text body and click on it, you will see the moving icon.
![]()
![]()


This allows you to move the row or content in the corresponding message as you wish.
Delete or copy
If you want to delete or copy a row/content, click on the corresponding field. The two icons for deleting or copying the field will appear in the lower right corner.

![]()
Adjust colour or row and internal spacing
Click in the row/content so that the edit bar appears on the left side. In the edit bar you can adjust the background, font color, row spacing and internal spacing of the corresponding row/content.
Formatting of the texts
You can adjust the formatting of your text (e.g. font type and size or links) per field. Click into the text field, the black formatting navigation will open. This is basically structured according to the familiar Word document scheme.

Links
Links can be inserted by the "chain icon". You can link to other websites as well as files (e.g. PDF, Excel). To link a file, please select "File Manager" in the dropdown. The file manager will open automatically. Now select your desired file. This file will be automatically added to the "URL" line. Apply your adjustment with the help of the "Ok" button.

With this icon ![]() next to it, links can be removed again.
next to it, links can be removed again.
You can also link files behind a button. Drag the content "Button" into your stored row and then click on it. On the left side, the "Content properties" will open. Under "Action" you can click on "Link file" below the URL line to directly access the file manager. Select your desired file in the file manager. The desired file will then be linked behind the button. If a participant clicks on this button, he will open your stored file.

Placeholders
Click in the desired text field in which you want to insert a placeholder. The black formatting navigation will open. Then click on "Show placeholders" to get to the placeholder manager. You can find more information about placeholders in this article.
Delete messages
You have already set up a message, but you don't need it anymore?
Click on the desired message to open it. Then click the trash can icon at the top right and confirm the confirmation window with the "Delete" button.
Attention!
This action is irreversible.
Next step: Select contacts for dispatch
