Assign your event tickets directly to your host(s) or let them book ticket contingents themselves. Allow them additionally to invite and manage guests independently.
Note:
This module is an additional function that is not available in the basic setup of evenito. Please contact your sales contact person or the Customer Success Team if you are interested in this function and would like more information on how to activate it.
In this article:
Activate required modules
In order to use the "Hospitality" module, it must first be activated together with the “Tickets” module in the "Modules" navigation item in your event.
In addition, the "Forms" and, optionally, "Location" and “Schedule” modules should be activated in your event. Depending on whether guest registration is carried out by your host(s) or independently by the guests, the "Website" module must also be activated.
Define settings in the “Tickets” module
In the following sub-sections, we will show you how to set the correct functions and settings for the "Tickets" module for the hospitality function.
To do this, first click on the "Tickets" module in your navigation bar to access the "Ticket types" menu item.
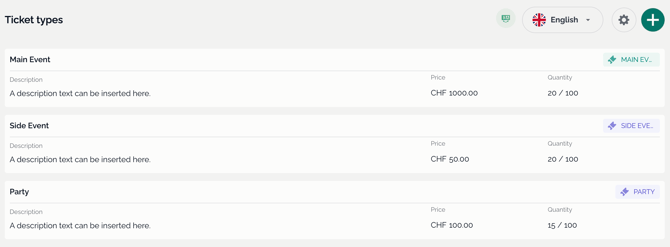
Create ticket types
To create one or more tickets, first click on the plus button in the top right-hand corner of the "Ticket types" menu item.
Please note:
Tickets can be published publicly (via the event website with payment processing), as well as via the "Event Info" page for hosts. This is possible with the Hybrid Ticketing. More information on how to set this up can be found in this article.

In the editing window that opens, you can now enter the following information:
- Name: First, enter the name that will be displayed to your participants.
- Colour: You can use colours to distinguish between tickets more quickly.
- In the next step, define the price and VAT per ticket.
- Use the "Quantity" field to regulate how many tickets of this type are available in total.
- Use the "Quantity per host" field to regulate the maximum number of tickets of this type that a host can book.
- If you select one or more groups in the "Assign contact to groups" drop-down menu, the participant will be assigned to these groups after selecting this ticket.
- If you want to add additional information to your tickets, you can enter it in the "Description" field.
Please note:
If your event is multilingual, please also provide the corresponding translations. To do this, click on the language selector.
Overview of ticket types
After clicking on the "Add" button, your ticket will be listed in the "Ticket types" overview. To create additional tickets, proceed as described above.
Attention:
Although the "Invoices" tab is displayed in the "Tickets" module, it is not relevant for the Hospitality module.
Define settings in the “Hospitality” module
In the following sub-sections, we will show you how to set the correct functions and settings for the "Hospitality" module.
To do this, first click on the "Hospitality" module in your navigation bar.
Define contents of the event info page
To determine which content should be displayed to your hosts on the "Event info" page, first select the “Hospitality” module in your navigation bar and then click on the "Event info" menu item.

Event details:
- The event name and date are automatically taken from the "Basics" in the "Event settings" section.
- To change the header image, click on the edit pencil at the bottom right of the image and select your desired file.
Content:
By activating or deactivating the toggle on the right-hand side, you can determine whether you want to display the "Description", "Location", “Schedule” and "Tickets".
Using the drag & drop icon, you can also move the arrangement of the individual modules on the "Event info" page.
Description:
This content is not automatically taken from the basic settings of the event, but can be customised. Here you can provide your hosts with information on how the event info page works, when tickets can be booked, contacts added and registrations made.
To edit the text, click on the edit pencil in the right-hand corner of the field.
The edit field will open for you to enter the text.
You can also activate the "Show timeframes" toggle. Another window will now appear below the description, showing the hosts the time periods you have previously specified – e.g. when they can book tickets or create contacts. To adjust the time periods, either click on the "Timeframes" button in the right-hand corner or go to the "Timeframes" menu item via the "Event settings" navigation point.
Location:
This information is automatically transferred from the "Location" module.
Schedule:
Similar to the location, the start time and title of the schedule items are transferred from the "Schedule" module.
Tickets:
The ticket types you have defined are also automatically inserted with their titles from the "Tickets" module.
Define settings for the event info page
On the right-hand side below the "Content" tile, you can activate the "Public booking page" switch in the "Booking page settings" area. This means that this event will be listed in the hosts' "Calendar" menu item and all hosts belonging to your space will be able to book tickets.
Once you have activated the switch, you can also add an image (recommended image format 2:1) for the event calendar. To do this, click on the edit pencil in the lower right corner to adjust the file.

If you don't want the event to be displayed for all hosts in your space, but would rather decide individually which hosts can book contingents, then deactivate the "Public booking page" switch. In this case, add the desired host(s) in the "Hosts" tab using the plus button.
Define settings in the “Hosts” tab
Then switch to the "Hosts" menu item and click on the gear wheel in the top right corner to open the settings.

Set timeframes
On the left-hand side, in the "Permitted date ranges" section, you will find an overview of your defined periods. If you want to adjust these, you can click on ![]() in the top right-hand corner to be redirected to the “Timeframe” menu item in the "Event settings".
in the top right-hand corner to be redirected to the “Timeframe” menu item in the "Event settings".
- "Host ticket booking": Defines the period during which your hosts can book tickets from the contingents you have defined.
- "Contact list changes": In this area, you define the period during which your hosts can upload their guest lists or manually add contacts via the "Contacts" module.
- "Registration by hosts": The period during which your hosts can register their guests. Once the host has assigned tickets to their participants, they can fill out the registration form directly and trigger a registration confirmation. However, in order for this to be sent, it must first be set up by you in the “Messages” menu item with the type "Registration confirmation".
Please note:
In order for a host to distribute tickets to their contacts, the "Registration by hosts" period must be defined and must not be in the past.
Apply your changes by clicking on "Save & close".
Please note:
If you do not define a time period, i.e. the "Open" and/or “Close” fields remain blank, this is equated with an "open" status. This means that the host can book tickets, make changes to the contact list or register participants at any time.
Registration for ticket allocation
On the right-hand side, in the "Registration settings" section, use the drop-down menu under "Registration on ticket assignment" to specify whether the host (or subhost) should require, allow or disable the completion of the registration form when issuing tickets.
- "Required" means that the form must be completed by the (sub)host for the participant.
- "Optional" allows the (sub)host to first assign the ticket and then fill out the form. However, there is also the option for the (sub)host to only assign the ticket to the participant, with the participant then registering themselves via the event website.
- "Disabled": If the host is only supposed to book the desired number of tickets, import the contacts and assign the tickets accordingly, but is not allowed to fill out the registration form for the participant, set the selection to ‘Disabled’. This way, as the event organiser, you can send the invitation collectively to all participants with ticket allocation, and the participants must register or deregister themselves via the event website. Further information can be found in the "Messages" sub-item.
Please note:
If the "Required" option is selected, the checkbox next to "Set as a registered" cannot be deactivated when assigning tickets to contacts. If the "Optional" option is selected, this box can be deactivated by the (sub)host.
If you select the "Optional" or "Disabled" option, you (as the event organiser) must ensure that participants receive an invitation directing them to the website with the registration form. The (sub)host has no way of communicating directly with their contacts via evenito.
The "Send confirmation" checkbox is only displayed if the message type "Registration confirmation" has been set. In all three cases, this should be set by you as the event organiser if you want participants to receive it after registration.
Max. Hierarchy depth (hosts)
If enabled for your space, you can also define the "Max. hosts hierarchy depth" for your event here on the right.
Please note:
Subhosts are an additional setting that must be activated by the Customer Success Team in your space. Please contact help@evenito.com for assistance.
In evenito, you can store the following information:
- 0 = No hosts or subhosts. This level refers to the event managers. They set up the event and add the hosts.
- 1 = Host. The event organiser adds one or more hosts to this event, who can now manage their own contingents and contacts.
- 2 = Subhost. The previously added host now also has the option of adding their own hosts, known as subhosts, and assigning them tickets from their own contingents. The ‘Hospitality’ menu item is now activated in their navigation. The subhost cannot book tickets themselves. However, they have the option of inviting their own contacts, assigning them tickets from their allocated contingents and managing them.
- 3 = Subhost. At this level, the "subhosts" of hierarchy level 2 now also have the right to add new users as "subhosts". Please note: As they retain the role of "subhost", subhosts at hierarchy level 2 still cannot book tickets themselves – in other words, they can only use the allocation assigned to them and distribute it to their subhosts.
The "Hospitality" menu item is now also activated for the host of hierarchy level 2.
The rules described in 2 apply to the subhost of hierarchy level 3. - 4 ff. = see process from level 3
Manage hosts & ticket contingents
In the following section, we will show you how to add your hosts and subhosts to your hospitality events and how to manage your ticket quotas.
Add your hosts to the space
If you are the administrator, first proceed as described in this article and add your hosts as new users. Make sure that you assign these users the role of "host" when distributing roles.
In the second step, you determine within your event, in the "Event Info" menu item of the "Hospitality" module, which event may be viewed by which hosts. The "Public booking page" setting allows you to specify whether it is a public event (visible to all hosts) or a private event (only hosts added by an event manager have access).
Add hosts to a private event
Please note:
You only need to add your hosts to your event for a “Private” event, i.e. the “Public booking page” toggle in the “Event info” menu item is deactivated.
In the “Hosts” menu item of the “Hospitality” module, you can add your hosts to your event. Click on the plus button at the top right to add your host to the event.
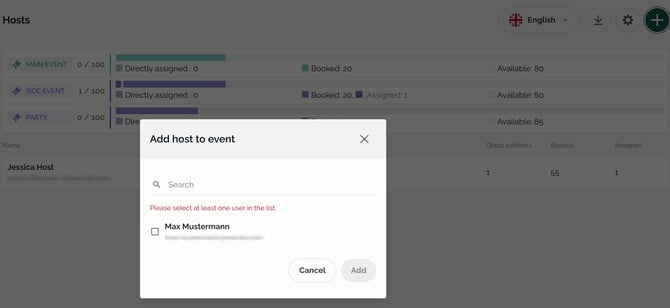
To be able to select a user from the user list that opens here, the users must first be assigned the “Host” role in the “User” menu item in the Space settings.
Now select your desired hosts by locating them via the search window and then activating the checkbox in front of the name. Confirm your selection using the “Add” button.
Add hosts to a public event
For public events, it is not necessary to add hosts to the event. A host who has been added as a user in your space can see this in their host calendar in the evenito back office. If the host then selects an event for which they would like to book tickets, they click on the "Tickets" button and are taken to the "Event Info" page. Further information on this can be found in this article.
If you, as the event manager, want to assign tickets for this event to some hosts in advance, proceed as described in this paragraph – first add your hosts to this event and then assign them tickets.
Assign tickets to your hosts
If neither your hosts nor subhosts are to book tickets themselves, as in a public event, you can assign them the desired tickets in the "Hosts" menu item in the "Hospitality" module. To do this, proceed as follows:
Once you have entered your host, they will be displayed below the booking statistics.
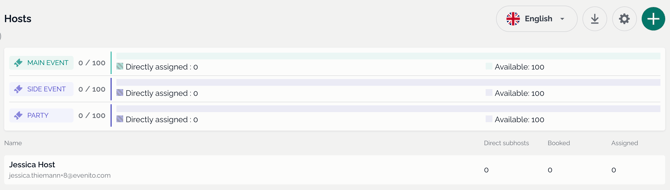
Click on the Host's name to open the information.

On the right-hand side, you can now click on the "+" button to select the desired (ticket) "Type" from the drop-down menu in the window that opens. Then, in the "Booked” field, define the contingents that is to be made available to the host. Save your settings using the "Add ticket type" button.

Please note:
Would you like to assign multiple ticket types to your host? Then please follow the same process described above for each type.
Of course, you can also correct your allocated contingents at any time. To do so, follow the steps outlined in this paragraph.
Booking statistics
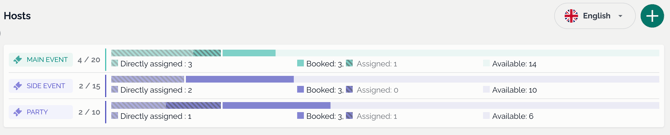
In the upper section of these statistics, the tickets you have defined are listed one below the other.
In the first column, you can see which ticket is involved. The tickets are listed with the names you have defined.
The numbers (in the example "Main Event": 4/100) in the second column indicate how many tickets have been assigned to the contacts (all contacts added to the event so far) from the total contingents you defined (in the example "Main Event": 100) (in the example "Main Event": 4). The booked tickets of all hosts are added together.
Column 3 (lightly shaded) shows how many tickets you (at your level) have directly assigned to participants.
Column 4 "Booked" (dark, single colour) shows the number of tickets that all hosts have booked from the total contingents you have defined per ticket.
Column 5 "Assigned" (dark shaded) shows how many tickets your hosts have already distributed to their contacts from their booked contingents. In other words, this basically represents the number of participants who have the status “registered” in a ‘normal’ event.
Column 6 "Available" (light, single-colour) shows how many tickets in total (across all hosts) are still available in the contingents you have defined, i.e. have not yet been booked.
Adjust a booking
Once a host has booked their tickets, for example, you can manually overwrite them. To do this, click on the host's name below the booking statistics to display their ticket selection.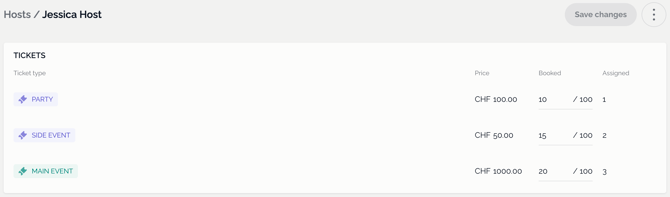
On the left side, you can see all ticket types that the host has booked or that have been assigned to them. On the right side, you can see the price of each ticket type in the first column and the number of tickets that this host has booked in the second column ("Booked’). To overwrite the contingents, click on the number in front and adjust the contingents accordingly. The third column ("Assigned") shows how many tickets from the respective contingents have already been assigned to the contacts from the host's list.
Please note:
It is not possible to fall below the number of tickets already "Assigned" (3rd column).
Transfer host data
If one of your hosts is unable to continue working at the event and you want to transfer data such as contacts, tickets and subhosts from one host to another, proceed as follows.
Click on the name of the host below the booking statistics to display their booked ticket selection. Then click on the three-dot icon in the top right-hand corner and select "Transfer host data".

You can now select a user from the list displayed to whom you want to transfer the existing data from your host. In order to select a user from the user list that opens here, the users must have been assigned the role "Host" and must not yet have been created as hosts in your event.
Now click on the name of the user to whom you want to transfer the data. A check mark will now appear to the right of the user name and the "Transfer host data" button will be active. Confirm your selection by clicking on "Transfer host data". The data will now be transferred directly to the selected new host.
The host whose data has been transferred will continue to be displayed below the booking statistics and the host to which the data has been transferred will be added.
Please note:
From now on, the new host will also be displayed in the contact overview for contacts that were previously added by the original host.
Add your subhosts
If you have set the max. hosts hierarchy depth to at least > 2 in the settings in the "Hospitality" module under the "Host" menu item, your hosts (or subhosts) can add a new subhost directly.
To do this, the host clicks on the "+" button at the top right of the "Hospitality" menu item.
The "Add host to event" window will then open. You can search for the desired name using the search field. If this name has already been created as a user, it will be displayed here directly. Otherwise, you can also create a new user here using the "+ Add new user" action.

Selecting the "+ Add new user" action opens a new window for adding a new user. After entering the email address, the system checks whether it already exists in the tool. If the email address is recognised, the user can be easily added by clicking the "Add" button. If not, the next step is to fill in the remaining data (system language, first name, last name). The role "Subhost" is assigned automatically and cannot be changed in the drop-down menu. By selecting the "Add user" button, the new user is created and receives a message to set the password for evenito.
Please note:
If a user logs in to evenito via SSO, no message prompting them to set a password will be sent to new users! In this case, it is up to your hosts to contact the subhosts directly (outside the evenito environment) and inform them that they must log in via SSO with their email address at app.evenito.com.
Attention!
If you want to test the function yourself or check the setup, it is best to use a second email address to assign it the host role. This way, you can continue to make adjustments in the evenito back office with your normal evenito user (which has the admin or event manager role) and check the adjustments in parallel with your second user, i.e. the host role.
Export your host data
In the "Hosts" menu item, you will find a download icon to the right of the language selector, which allows you to export your host data.
This export contains the following data:- The full name of the host
- The host's email address
- The ticket types booked
- The number of tickets booked per ticket type
- The number of tickets assigned to participants per ticket type
- The cost per ticket type (total for all tickets)
- The cost per ticket type (per ticket)
- The event name
Contact overview
As the event organiser, you can view all contacts imported by your hosts into evenito (or added manually) in the overview in the "Guest Management" module under the "Contacts" menu item.
Please note:
Your hosts can see both their own contacts and those of their subhosts. Using the filter function ("Show filter"), the host can filter which contacts are to be displayed in the "Contacts Hosts" drop-down menu – only their own or also those of the subhosts.
However, hosts cannot view any contacts other than their own and those of their subhosts (e.g. from other hosts).
We recommend using the edit pen on the right-hand side to add the "Contacts Host" field. This way, you can see directly in the overview which participant belongs to which host.
The "Ticket Types" column lists all tickets that have been assigned to a participant.
Please note:
evenito is not a CRM. Participants must therefore be added to each event individually by your hosts.
If you are the event organiser and would like to assign tickets directly to your hosts' contacts, follow the steps described in this article.
Messages
Please note:
Messages are only sent if they have been set up. Depending on your preferences, the types "Registration confirmation", "Decline confirmation" and "Invitation" are particularly relevant. Of course, you can add further messages to these.
The registration confirmation and cancellation confirmation are relevant both when the host fills out the registration form for the contact and thus registers them, and when they subsequently withdraw from the event after being contacted directly. But also when you, as the event organiser, invite the participants and they register/cancel themselves.
If the "Disabled" option has been selected in the "Registration settings" area so that the host cannot invite their participants themselves, you, as the event organiser, are responsible for sending the invitation.
In this case, we recommend that you use the following placeholders for the host in the invitation:

You can select these in the placeholder manager in the "Host" tab.
Further information about the messages can be found here.
Please note:
Since no direct communication or information can be sent to the hosts at this time, it is also possible to include the host in bcc in the message via the placeholder [[contact.host.email]]. This way, you will receive a copy of the message when participants register or deregister (especially in process 2).