
This article describes the options you can use to check in or check out a participant in the app. It also describes other functions such as the quick check-in.
Before using the app, we recommend that you check the information in the article requirements and preparations.
In this article
Settings " "
"
To open the settings, click on the gear wheel at the top right.
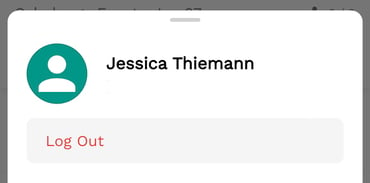
At first you will see which user you are logged in with. Here you can also log out using the button of the same name.

If you are a member of more than one spaces, you can select the one you want in the settings. All events of the space are listed under "EVENT". Select your desired event in the overview.
As soon as the quick check-in/out is activated, every contact whose QR code has been scanned using the app is automatically checked in. That way you don't have to click on "Check-in" or "Check-out".
Filters " "
"
This function offers you 3 setting options, which can also be used in combination:
- Registration status
- Group
- Check-in status
Status
The status shows the registration status of your contacts. You can define whether you want to display only registered, declined or pending contacts or, for example, all participants.
If you set the filter to "registered", for example, the other contacts in the overview are hidden. The total number of contacts in the top right corner remains unaffected.
Please note:
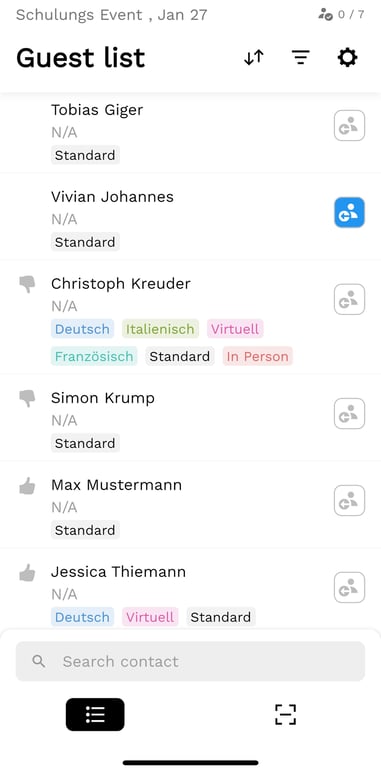
The guest list shows all contacts of the event:
- The first number at the top right (here 0) represents how many contacts have already checked in, i.e. are on site.
- The second number (here 7) indicates the total number of contacts in the event - regardless of whether they are registered or declined.
Group(s)
Your participants belong to different groups? Via the tab of the same name, you have the possibility to individually determine which of the groups should be displayed in the contact overview. If, for example, you only want to grant access to a workshop room (e.g. Workshop 1) to those participants who have previously registered for it, you can set the filter accordingly to the group "Workshop 1". The groups had to be either automatically stored as actions in the registration form or manually assigned to the participants by you.
Please note:
If you want to display all contacts on your guest list, you can either select all 3 status fields and/or groups or, alternatively, leave both areas unchecked. In the latter case, the filter "All" is automatically set.
Check-in status
With the check-in status, you can filter your contacts according to whether they are already checked in, checked out or not yet checked in. This allows you to see at any time how many guests are currently at your event or how many guests you are still waiting for at the check-in.
Sorting "  "
"
With the help of this tab you can individually change the arrangement of the contacts. You can choose from the following attributes:
- Sorting by "Last name"
- Sorting by "First name"
- Sorting by "Company"
- Sorting by "Registration date"
For the options "First name", "Last name" and "Company" you can change the order alphabetically from A-Z or Z-A.
If you select the option "Registration date", you can sort the contacts either by "Earlier - Later" or "Later - Earlier" date.
Search box " "
"
You can search for a contact's first name, last name or full name using the search box at the bottom of the app.
Guest list " "
"
Please note:
If the number of contacts listed does not match those in the back office, proceed as follows:
- Please check if your check-in session has already expired. If it has expired, be sure to log in again with the same login as before so that your data is not lost.
- Please check if you have downloaded the latest version of the app.
- Please check whether filters have already been set in the app that might influence the display of the contacts.
- Click on the "Force Sync" button in the settings op the app to force a data update.
Use the following icons to get more important details about the contact:
Login status (first column):
 = Registered (On the screenshot e.g. Max Mustermann and Jessica Thiemann)
 = Declined (On the screenshot e.g. Simon Krump and Christoph Kreuder)
- Kein Symbol = Pending, Teilnehmer ist weder ab- noch angemeldet (On the screenshot e.g. Tobias Giger and Vivian Johannes)
Check-in status (last column):
 = Neither checked in nor checked out.
  = Checked-in (The contact is on site).
 = Checked-out (The contact has left the location). Displayed if the check-out function is used.
Please note:
You can click directly on the check-in icons in the guest list overview. Here's what happens:
- Click on the white symbol: Contact is checked in
- Click on the green symbol: Contact is already checked in and is checked out by clicking on it.
- Click on the blue symbol: Contact is checked out and is checked in again by clicking on it.
Further details on the guest list per contact:
- First- & Last name
- Company
- Group(s)
View contact details
Click on a contact to see more details:
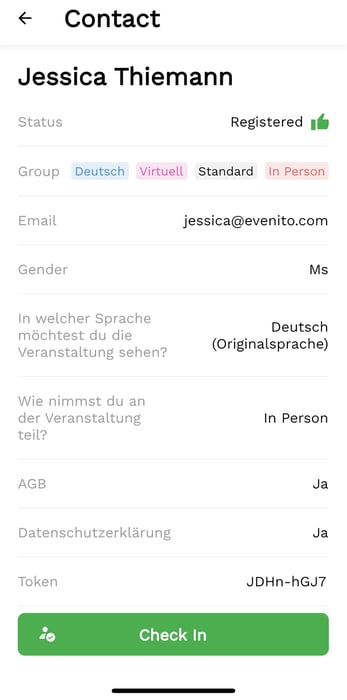
On the detailed view, you will first see the status, the group(s) and the email address.
After that, further contact fields and additional questions are shown.
At the bottom you will see the individual token and have the option to check the contact in or out using the button.
QR code scanner " "
"
You have sent your participants the QR code with their tokens by e-mail? Then you can use the QR code scanner to check in the participants even faster and avoid confusion. Click on "![]() " to open the camera automatically. Then you can scan the QR codes of the contacts and the app shows you the details of the contact directly:
" to open the camera automatically. Then you can scan the QR codes of the contacts and the app shows you the details of the contact directly:
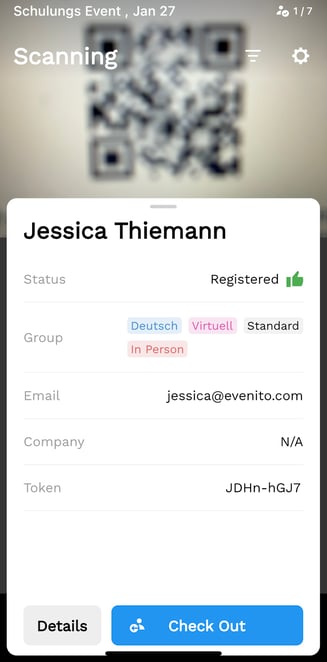
Now you can check the data such as the registration status or the group and check the contact in or out via the button at the bottom right. Under "Details" you can access further details of the participant.
All you need to do to scan the next QR code is point the camera at it. The new contact is then loaded automatically.
If you have activated the "Quick check-in/-out" function in the settings, not only will the contact be called up, but the following action will be performed directly:
- Neutral participants are checked in directly
- Checked-in participants are checked out directly
- Checked out participants are checked in directly
The following information above the contact always shows the current status (after the action) of the contact - in the example shown, "checked out":

The number next to the status shows how many contacts are currently checked in. In this case, none of the total of seven contacts is checked in and therefore on site.