
You have defined your booth types and now want to fill them with virtual booths? In our example, we now add a sponsor.
In this article
Add new booth
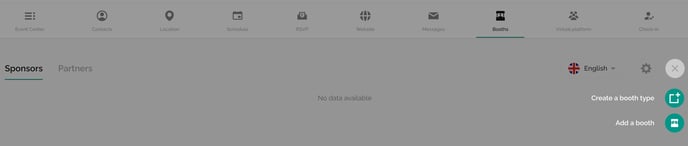
First select the correct booth type in the top left corner by clicking on the desired tab.
Please note:
This note applies if you have created several booth types.
Afterwards, click on the plus sign on the right-hand side and select the option "Add a booth" in the dropdown.
You can now enter the following information for each booth:
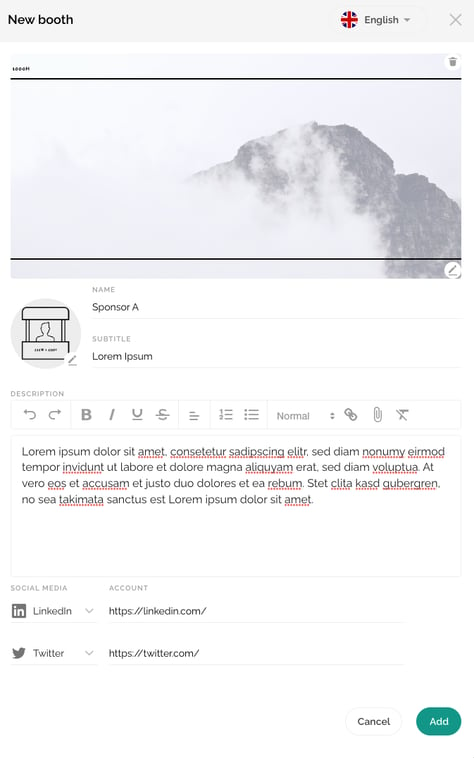
- Cover Image
- Name (mandatory field)
- Subtitle (mandatory field)
- Profile picture (mandatory field). You can find more information about the image sizes HERE.
- Description
 : The options "bold", "italic" and "underlined" can be displayed as text formatting.
 : In addition, you can create bulleted lists using the indents or numbering.
 : Do you want to make files available? Then click on the staple symbol. Please note that the file name you defined before uploading is displayed.
 : If you want to set files or links as word links, mark the desired word(s) and select the chain icon for a link and the staple icon for a document.
Please note:
Unfortunately, it is not currently possible to display different font sizes on the platform, which have been stored via one of the 4 options below. The displayed size is always "Normal".
We also recommend that you do not use breaks/paragraphs, as these are displayed with bigger spacing:
- Social media profiles: You can choose from LinkedIn, Xing, Twitter, Facebook, Instagram, Pinterest, YouTube, Vimeo, Spotify, email and more.
Please note:
If your event has been set up in several languages, make sure that you store the above information for all languages. Use the language changer for this purpose. The language assistant can help you with this. You can find detailed information in this article.
After you have saved the stored information using the "Add" button, the newly created booth will be added to the overview within the respective booth type.

Attention!
For security reasons, some content can not be applied and displayed. For example, externally embedded images and fonts are not shown properly.
Edit or delete booth
Hover over the desired booth to edit or delete it:
To edit your booth, simply click on it.
The deletion process using the trash can icon ![]() is irreversible.
is irreversible.
You can change the arrangement via drag & drop using this icon ![]() .
.