
In this article:
The "Waiting List" module was developed to help you efficiently manage events that are already fully booked. Instead of turning away interested participants, you can collect their registration details and manage them manually or automatically with evenito.
Attention:
Currently, the Waiting list is not compatible with all modules and functions. All restrictions can be found here.
Activate waiting list
To enable your participants to join the waiting list as soon as your event is full, you must first activate the function in your contact settings.
To do this, navigate to "Guest Management" and select "Contacts".
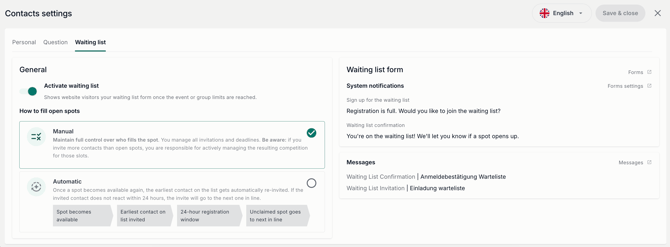
Click on the gear icon at the top right to access the "Contact settings" and open the "Waiting list" tab there.
Activate the "Activate waiting list" toggle, decide whether the waiting list process should be "Manual" or "Automatic" and confirm your selection via the "Save & close" button.
Note:
In the contact settings, you can see on the right side which system notifications are already stored and whether the required messages with the corresponding message types have already been set up in your event. From here, you can jump directly to the form, the form settings, or the messages to fully complete your waiting list setup.
Define limits
To be able to use the waiting list, your event must have an active registration process and set limits.
Go to the "Event settings" and open the "Limits" tab to store your general or group-specific registration limit. Further information on the limits can be found here. Keep in mind, that a group-specific limit is only affected when a participant registers if it is the participant's original group.
Please note:
We recommend using either a general registration limit or a group-specific registration limit. Combining both types of limits with a waiting list can lead to logical overlaps and, as a result, conflicts in the registration process.
Set up form
Now set up your registration form in the next step. To do this, go to "Guest Management" and open the "Forms" menu item.
Define notifications
In the "RSVP settings", you will now find the "Waiting list" tab under "System notifications".
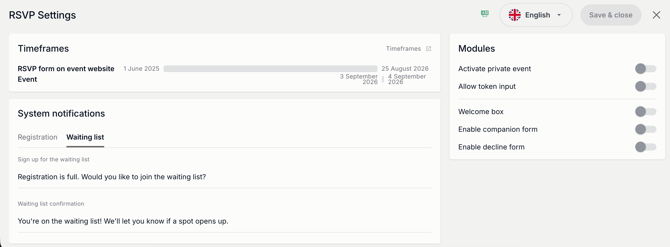
In this tab, you can now define the new system notifications "Sign up for the waiting list" and "Waiting list confirmation".
The text "Sign up for the waiting list" appears in your form as soon as the registration limit of your event is reached. The text "Waiting list confirmation" appears as soon as a participant has successfully placed themselves on the waiting list of your event.
Create form
As soon as you have activated the waiting list in your contact settings, the waiting list form will automatically appear at the bottom of your forms.
You can now design this exactly like any other form in evenito and insert the necessary contact information fields and additional questions.
To save time, you can copy the structure of your registration form into your waiting list form with a click on the "Copy from main form" button.

Further information on form creation can be found here.
Important Note on Answer Limits in the Form: If you use additional questions with limited answer capacity, the system automatically protects your quotas from overbooking when participants move up from the waitlist:
-
If a guest on the waitlist selects an option that is fully booked by the time they are invited to the regular registration form, that option remains preselected in the form but is marked as fully booked.
-
The submit button remains disabled until the guest selects an alternative option that is still available. This prevents capacity-limited slots (e.g., for workshops) from being overbooked via the waitlist.
Please note:
Use the language switcher at the top right for a multilingual event to store the notifications and the form in the respective languages.
Set up messages
By activating the waiting list, two additional message types are now available for use.
You have the option to create a "Waiting list confirmation", which is sent automatically or manually as soon as a participant has joined the waiting list, and you can set up the "Waiting list invitation", which you can send manually or automatically as soon as a participant is to be invited to your event from your waiting list due to a place becoming available.
To set up your messages, proceed as described here and select the corresponding type for your waiting list message in the settings of the message, in the "Type" dropdown. In your waiting list invitation, you can use the placeholder [[event.register]] or [[event.personalSite]] as usual to direct your participants to the website or the registration form.
Further information on setting up your message can be found here.
The participant journey
As soon as the defined limit of your event is reached, the registration process for your participants adjusts automatically:
The standard registration button on your website changes automatically to "Join Waiting List". Your participants are greeted with the system notification you defined under "Sign up for the waiting list" (e.g., "Registration is full. Would you like to join the waiting list?").
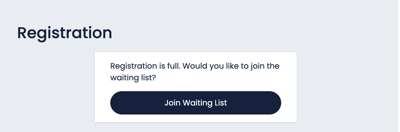
After clicking "Join Waiting List" the waitlist form you created will open for your participants.
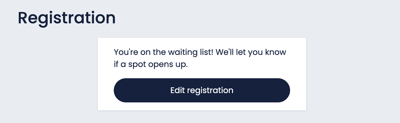
After submitting the form, your participants receive the "Confirmation for waiting list" on the screen and, if configured in the communication menu under "Messages", an automated email "Waiting list confirmation".
Manage participants
To manage your waiting list contacts, go to the "Waitlisted" tab in the “Contacts” navigation item in "Guest management".
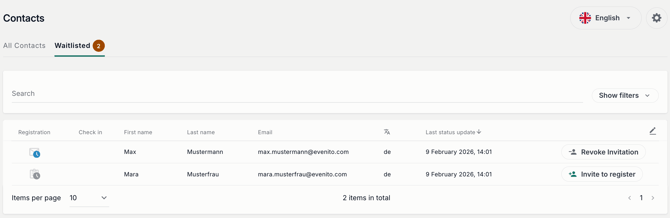
All contacts who join the waiting list will be displayed in your waiting list and your contact list with the status  "Waitlisted".
All contacts who have currently been invited to the event from the waiting list are displayed with the status  "Waitlisted invited". Contacts for whom you revoke the invitation or for whom the registration deadline has passed will revert to the "Waitlisted" status.
Manual management
The manual waiting list is a manual process, meaning it must be controlled by you
Manually inviting/registering participants to the event
To invite or register a participant who is currently on the waiting list, click on their registration status and change it from "Waitlisted" to "Waitlisted invited".
-
If you select "Waitlisted invited", you will be asked if you would like to send the "Waiting list invitation" message. The participant will then receive your message and can follow the link to the website to complete the regular registration process for the event.
-
If, however, you wish to set the participant directly to "Registered", they must first have the status "Waiting list invitation" (in this case, do not send the waiting list invitation). Only from this status can the participant be manually switched to "Registered". If you do this, a pop-up will ask if you would like to send your prepared "Registration confirmation". In this case, the participant has been registered directly by you and no longer needs to complete the registration process themselves.
Please note:
Since the invitation from the waiting list is a manual process in this case, we recommend entering your own e-mail address in the BCC field of your decline confirmation. This way, you will be notified immediately if a place becomes available through a cancellation, as you will receive a copy of every decline confirmation and will know that you can now invite a participant from your waiting list to the event.
Additionally, you have the option in the waitlisted tab on the right, for a participant with the status "Waitlisted", to click on the "Invite to register" button.
A confirmation window then opens, showing you whether the participant has added "Companions", as in this case you need more than just one free place in the event. It also shows you that the waiting list invitation message will be sent to the participant when you click on "Confirm".
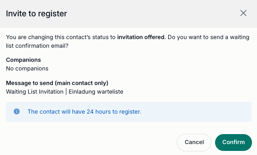
If a participant has already been invited from the waiting list to register, you have the option to click the "Revoke invitation" button to withdraw the offered place from the participant again.
Please note:
-
No automatic process in manual mode: If you manually invite a guest from the waitlist, the 24-hour time window does not apply. The "Waitlisted invited" status remains in effect until you manually revoke the invitation or update the status.
-
Manual status changes and invitations from the waitlist are possible at any time, even outside the registration period.
Manually placing contacts on the waiting list
You can also place a contact on the waiting list yourself by clicking on the registration status of the contact in the contact overview and selecting the status "Waitlisted". A window then opens in which you can decide whether you only want to change the participant's status (click on "Confirm & don't send") or whether you want to send your set up message for the "Waiting list confirmation" (click on "Confirm & send"). The participant will then be displayed in the "On the waiting list" tab.
Automatic management
If you have set the waiting list to "Automatic", the system takes over the entire follow-up process in four consecutive steps:
-
Spot becomes available: The process is triggered automatically, within 1 minute, as soon as a spot in the event is available again, e.g., if a participant has deregistered from the event.
-
Invitation of the next contact: The system identifies the contact who joined the waiting list first (based on the registration time) and automatically sends the waiting list invitation.
-
24-hour registration window: The invited contact now has a time window of exactly 24 hours to react to the invitation and complete the registration. The 24-hour countdown pauses on Saturday and Sunday. You cannot adjust this time frame.
-
Passing on if not used: If the contact does not react within the 24-hour period, the claim expires, the contact is moved to the end of the waiting list and the free spot is automatically passed on to the next person on the waiting list. Once the deadline has passed, the contact will be returned to the "Waitlisted" status.
Please note:
-
If, for example, only 1 spot becomes available, but the next participant on the waiting list wants to come with 1 companion (2 people in total), the system skips them and selects the next guest who only needs 1 spot.
-
To avoid overbookings with limited answer options, the system automatically detects during the final registration process if a previously selected answer option has been chosen in the form that is already full, and forces the selection of an available alternative with a deactivated submit button.
-
Manual mode is locked in automatic mode: If the "Automatic" mode is activated, the user cannot use the "Invite to register" or "Revoke invitation" buttons. Furthermore, no status changes can be made.
- Once the 24-hour period has expired, you can only check the contact logs to see if a contact has already received a waiting list invitation.
- Automatic promotion from the waiting list occurs exclusively within the defined registration period (RSVP start and end dates). No automatic invitations are sent outside of this window.
Current restrictions
To ensure a smooth process, please note the following technical limitations:
- Limits: A combination of general and group-specific limits is not recommended, as this, when used in conjunction with a waiting list, can lead to logical overlaps and thus to conflicts in the registration process.
- Limits on answers in the form: Capacity restrictions on individual answers in the form (e.g., limited workshop spots) do not trigger the waiting list.
-
Ticketing: The waiting list form does not work in connection with the ticketing module.
-
Hospitality: The waiting list form does not work in connection with the hospitality module.