In this article:
You can find the “Messages” in the navigation bar under “Communication”. In the message overview, you can either create a new message using the plus button, click on an existing message to open and edit it or copy a message.
Message settings and sender information
You can open the “Message settings” via the cogwheel button. ![]() All sender information for the message is stored there. The following options are available for this:
All sender information for the message is stored there. The following options are available for this:
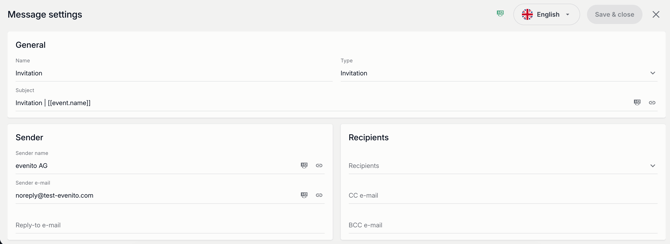
- Name: Name of the message in the message overview (only displayed in the back office, not for recipients)
- Type: Various message types are available, e.g. invitation or registration confirmation
- Subject: Subject line that is displayed in the recipient's e-mail client
Sender:
- Sender name: This name is displayed as the sender in the recipient's e-mail client
- Sender e-mail: The message will be sent from this e-mail address
- Reply-to e-mail (optional): Here you can enter an e-mail address other than the e-mail sender to which replies to the message should be sent. If this field is empty, the sender email address will be used for replies.
Recipients:
- Recipients: All groups defined in ‘Guest management’ can be stored as recipients here
- CC e-mail (optional): E-mail address in CC for each message sent (displayed to recipients)
- BCC e-mail (optional): E-mail address in BCC for each message sent (not displayed to recipients)
You can also use placeholders for the fields Sender name, Sender e-mail, Subject and Reply-to e-mail. Simply click on this symbol. ![]()
Multiple e-mail addresses or placeholders can be used in the CC and BCC fields. Multiple e-mail addresses must be separated by a comma and a space (e.g. first@email.com, second@email.com)
Attention!
The message types registration confirmation, companion registration confirmation, decline confirmation, ticket purchase confirmation, refund confirmation, waiting list confirmation and waiting list invitation (depending on the setup of the waiting list) are sent automatically when a participant registers, deregisters or purchases a ticket. The remaining message types must be sent manually.
Multilingual messages
The message settings and the content of a message must always be maintained in all event languages. Messages are sent in the language stored in the corresponding contact.
You can switch between the different language versions using the language switcher above the message editor.
This symbol ![]() shows whether all content is stored for all languages. Red means that content is still missing, green means that all content is filled in all languages.
shows whether all content is stored for all languages. Red means that content is still missing, green means that all content is filled in all languages.

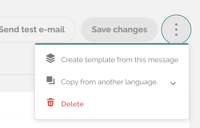
To transfer the design of a message from one language version to another language version, click on the three dots at the top right and select “Copy from another language”. The structure and settings of the message are transferred and only the texts need to be translated.

You can find more information about the language switcher and multilingual events in this article.
Structure of the e-mail editor
Below we will show you how the e-mail editor is structured and how you can fill and design a message with content.
Settings
In this tab, you define the basic settings for the width of the email body, the background color of the content and the fill area as well as the default font and font and link color.

Rows
You can use rows to structure your message. Various layouts with different numbers and divisions of columns are available for this, so that you can also place content in several columns next to each other, for example. You can simply drag and drop a row to the desired position in the message.
Each row has its own settings. This allows you to design your message flexibly and, for example, define the background color of an entire row, content or a specific column independently of each other.

Content
Once you have defined the general settings and set up your email structure using the rows, they can be filled with content. You can insert the content into the rows using drag-and-drop.
The following content is available:
Each content type has its own functions and settings. By clicking on a content in the message, the settings are automatically displayed in the editor on the left.
Editing structure and content
Once the structure is in place, you can fill it with content such as images, text and buttons.
Moving rows and contents
If you hover over or click on a row or content in the text body, an arrow symbol for moving is displayed.

![]()
![]()

You can use this to move rows and content using drag-and-drop.
Deleting or copying
Click on a line or content to display two icons for deleting and copying.

![]()
Adjust color and padding
Click on a row or content to display the editing options on the left-hand side. There you can adjust the background and font color, as well as spacing and padding for the corresponding row or content.
Text formatting
Click on a text to open the formatting bar. There you can, for example, set the font, font size and alignment of the text or insert links. You will also find the placeholder manager here, which you can use to insert all the placeholders available in the event into your message. You can find more information about placeholders in this article.
Links
You can insert a link using the link symbol in the text formatting bar. You can link to other websites or files (e.g. PDF, Excel). To link to a file, select “Link file” from the drop-down menu and then select the desired file from the file manager. The corresponding link is automatically stored in the “URL” line.

With this symbol ![]() links can be removed.
links can be removed.
Files can also be linked in a button. To do this, drag the “Button” content into a line and click on it. On the left-hand side, you can select a file in the file manager under “Action” via “Link file”. If a recipient clicks on the button in the email, the file will be downloaded automatically.

Placeholders
As described above, you can insert placeholders via the text formatting bar. To do this, click on a text field and then on “Browse placeholders” to access the placeholder manager. You can find more information about placeholders in this article.
Copying messages
You can copy an existing message by hovering over a message in the message overview, then clicking on the three dots on the right and selecting “Copy message”.
Creating a message template
You can create a template from a message in order to reuse it in the future. This means you don't have to create and set up all messages again for a recurring event. To do this, click on the three dots at the top right and select “Create template from this message”. You can then choose a name for the template and save it. When creating a new message, you can then choose from the existing templates. You can find more information about templates in this article.
Deleting messages
You can delete messages in the message overview by hovering over a message, clicking on the three dots on the right and selecting “Delete”. If have opened a message, you can also click on the three dots in the top right-hand corner and select “Delete”.
Attention!
This action is irreversible.