In this article
Enable multiple event languages in your basic settings
First you have to activate all the languages you want to use in your event. To do this, click on the menu item "Event settings" and open the tab "Basics".
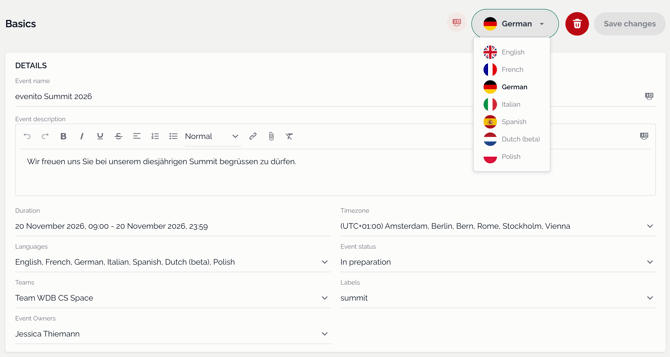
Using the drop down menu under "Languages" you have the possibility to add further languages to your event. Use the "Make default" button to define which is your main language. If you click on the language switcher, a dropdown will open in which you can select the desired language and switch to it. You can choose between German, English, French, Italian, Spanish, Dutch (beta) and Polish.
Attention:
The languages to be selected here are the event languages. Event languages are the languages in which your communication and website will be displayed to your participants. They are not to be confused with the system language, which you store in your user profile.
Functionality of the language switcher & language assistant in the back office
The language switcher
You can find the language switcher in almost all places in your back office on the top right side below your menu bar or inside of a pop up window. The symbol is displayed either in green or in red.

In the dropdown of the language switcher you can jump back and forth between your selected event languages.
As soon as you have filled all fields that are already completely filled in one language in all other languages, the color of the multilingual icon changes from red to green. This way you can check if you really have stored all contents in all languages in the back office.
Please note:
The language switcher does not check your translations. The icon turns green as soon as all corresponding fields are filled with text. Please make sure that you enter the correct translations in the appropriate places.
The tool currently does not actively point you to the place where content is still missing. This requires a manual check on your part.
Next to all text fields to be translated, you will also find a language assistant in the form of this icon ![]()
If you have already defined your text in one or more languages and switch to another language via the language switcher, you can click on the icon with the mouse and the drop down menu directly below will now display your already stored content in these languages.
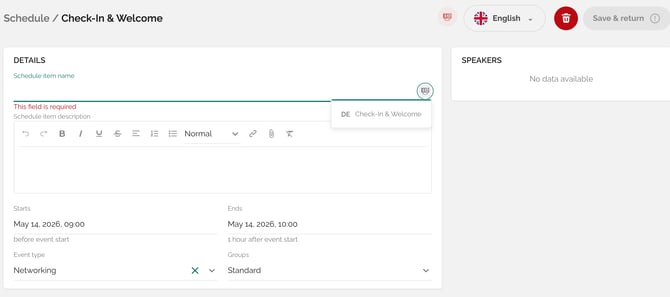
You can now either follow the other languages and enter the missing translation manually, or alternatively click on one of the options in the drop down menu. Your selected heading will then be transferred to the still empty field and can now be overwritten by you now or at a later time.
Please note:
In some cases, the language assistant is only displayed after you have already entered a text in a language - this applies to the description text, for example.
If this symbol ![]() is not displayed next to an input field, no language assistant is active for this field and you have to enter your translations manually.
is not displayed next to an input field, no language assistant is active for this field and you have to enter your translations manually.
Content on the event website must be maintained for each event language.
You can use the language switcher in the website editor to switch between the different language versions so that the respective website version is displayed in the preview.
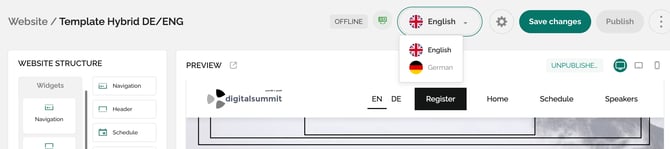
The translations must be stored in the individual website widgets.
To do this, open the settings of a widget by hovering over it in the “Website structure” and click on the pencil icon to edit.
You can use the language switcher to switch between languages and use the language assistant. You can displays the texts already stored in the other languages via this icon ![]() insert them by clicking on them.
insert them by clicking on them.

Some widget content (e.g. registration, location, speakers and schedule) on the website is automatically filled with the content from the corresponding menu items and must therefore be translated elsewhere in the tool. Missing translations elsewhere can also lead to the display of a red language assistant symbol.
In the navigation on the website, participants can switch between all available event languages. When a participant opens the website via a personal invitation link, the website is automatically opened in the language stored in the contact.
![]()
Please note:
If a participant registers on the german website, the language “German” is automatically stored for this contact. This also works if you invite the contact in English, the contact switches to a different language version on the website and registers using this language. The language in the contact information is updated automatically.
To set up a message in multiple languages, you must first set up the desired message in one language, with all your design settings, as well as a defined structure with the intended content. In this article we will explain how to create a new message.
You can now use this layout and all the corresponding settings for your other languages and then only have to change the content accordingly per language.
To do this, use the language switcher to switch to the language for which you would like to adopt the message that has already been customised and designed.
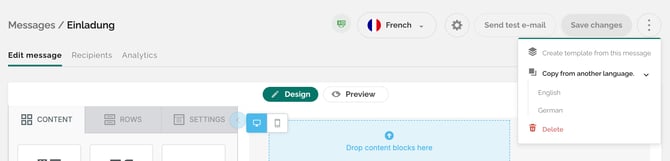
On the right side, next to the "Save changes" button, click on the three dots.
In the dropdown that opens, select the function "Copy template from another language" and specify which language template should be transferred.
As soon as you have selected the language you want to transfer, the layout and content will be copied and can be edited by you.
Using the language switcher next to the wheel, you can jump back and forth between the different languages at any time.