
In this article, we will show you how to add as many event specific additional questions and subquestions as you like and explain which types (text response, single-selection, multi-selection) are available.
In addition, we will go into the limitation of participant answers and show how your participants can be automatically assigned to your defined groups with the help of actions.
In this article
How do I create an additional question?
Please note:
Main questions are displayed with this icon ![]() , while subquestions are shown with this icon
, while subquestions are shown with this icon ![]() .
.

To add event specific questions (e.g. food requests, accommodation, shuttle, workshops, DSGVO, etc.) in the registration form, click on "Add item" in the "Personal information" section at the bottom right and select "Question" in the dropdown. In the next step, select the "+ New question" option. If you want to make further adjustments, select the field again.
Next, define the type of your additional question:
- Text answer (short text, long text)
- Single-select: Your contacts can select one of several answer options.
- Multi-select: Your contacts can select multiple answers.
In the next step, enter your question under "Title".
Attention!
The word "Select" should not be used in the title of a question as this will cause an error message.
Finally, you can predefine corresponding answers for the types "Single-select" and "Multi-select". You are not limited in the number of answers.
In addition, you can add a descriptive text to your question in order to provide the participant with further information or to request legal queries such as privacy policy regulations or conditions of participation. You can either store these in plain text form or provide the text with further links or PDFs.
The text field for your description automatically gets bigger the more content you add.

- To add links, please mark the word or text area you want to link and then click on the chain icon (3rd symbol from the right).
- You want to attach a PDF? Then please click on the staple icon (2nd symbol from the right), which will open the file manager. Select your file and insert it. Make sure that you give the document a unique name, because this name will be displayed.
- You want to copy and paste a text passage from a document or from your website, but the formatting was taken over? Click on the crossed out T symbol (far right) to delete all formatting and presets.
Attention!
For security reasons, some content can not be displayed in edit mode in the site builder. For example, externally embedded images are displayed as broken images and externally embedded fonts might not be displayed correctly. However, all content can be accessed and used via the preview button and the published website.
For all event specific questions you can individually define whether they are "Required", "Optional" or "Read only".
Copy questions
If you need a question multiple times in your registration form, you can copy a question that you have already created.
Explanatory example:
If you want to offer a test drive for different days, with the slots taking place at the same time every day, you can first answer the main question with the exemplary title "Please select your desired day" and define the respective days as answers. In the next step, you then set up a subquestion (see the next subchapter "Subquestions") with the exemplary title "Please select your desired time slot" and enter all available times as answer options. You can then assign the respective answers to associated groups (you can find more information in this article in the subchapter “Actions”) or limits (see subchapter “Limitation of participant response”). So that you don't have to recreate the time slot subquestion every day, you can duplicate it.
To do this, click on the copy symbol ![]() next to the "Show conditions" button in the top right of the relevant question. Your original question will be closed and your copied question will now open directly below it.
next to the "Show conditions" button in the top right of the relevant question. Your original question will be closed and your copied question will now open directly below it.
You can now edit and, for example, replace the answer options or add a new title or description text.
Please note:
Group assignments ("Actions") and conditions set, i.e. that a question is only issued for a specific group in the registration form (see subsection "Conditions") of your original question are not copied and must be repeated by you in the new question according to yours requirements are set.
You also have the option of setting separate limits again by overwriting the copied limits according to your new answer options.
If you also want to include a (sub)question in the registration form for the companions and want the answers to access the limits you have already set in the question, please proceed as described in the next section.
Subquestions
evenito allows you to create your registration form in different complexity. You decide whether your questions should have one level or subquestions.
Below is an example of a multi step registration form:
First click on "Add item" > "Subquestion" > "Add question" as described in the chapter How do I create an additional question? in the dropdown.
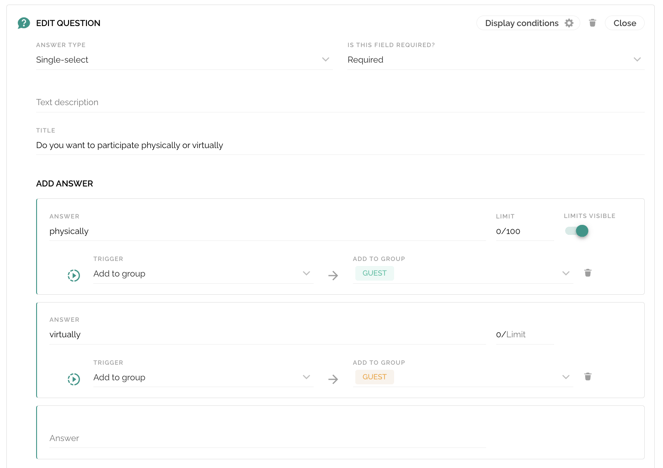
Then define the type of question, whether it is required or optional. In the next step, formulate the question and a possible description and add answers (only for Single-select, Multi-select).
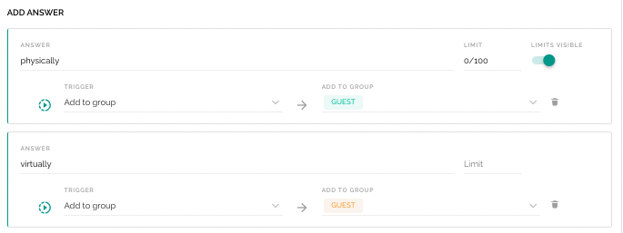
In this example, the first question is "Do you want to participate physically or virtually?" and 2 answers have been defined: "physically" and "virtually".
To assign a subquestion to an answer, proceed as follows:
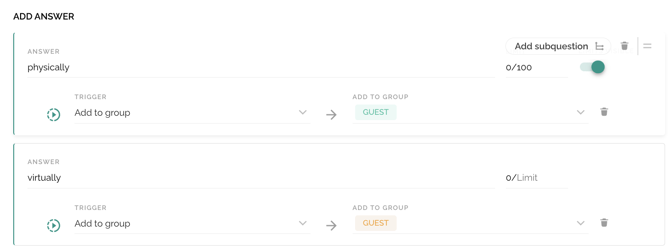
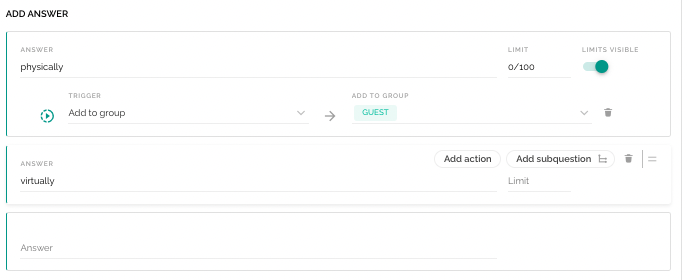
Move the mouse pointer over the desired answer (e.g. "physically") so that the action "Add subquestion" appears on the right side.
Select between "New subquestion" and "Reuse question" in the dropdown that opens.
New question
If you have chosen the option "New subquestion", a new question will be opened below your first question (here: "Do you want to participate physically or virtually?"). This subquestion is marked with the symbol ![]() .
.
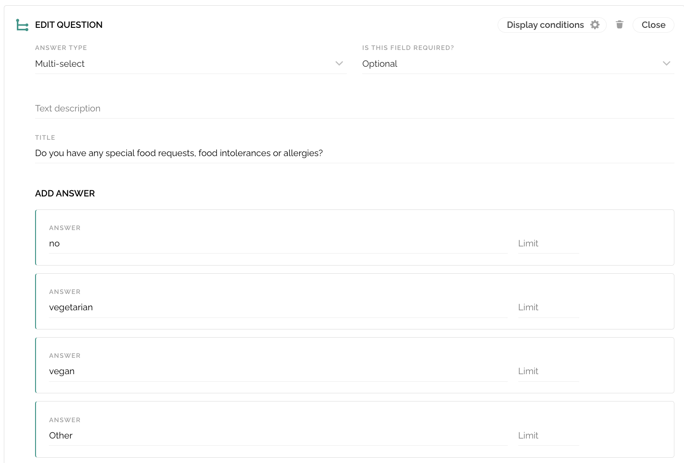
In this example, the subquestion for the answer "physically" is: "Do you have any special food requests, food intolerances or allergies?" and there are again 4 answer options to choose from.
Here, you also have the option of creating one or more subquestions for each answer. To do this, proceed as described in the previous example by hovering over the desired answer, then selecting the "Add subquestion" function and deciding whether you want to create a new subquestion or reuse a question that has already been set up.
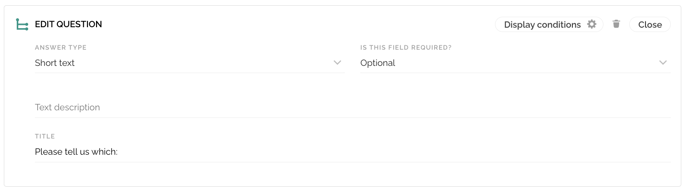
In this case, a "short text" question was created for the "Other" answer ("Please tell us which:"). Thus, a 2nd level subquestion has been created.
Reuse question
Please note:
"Reuse question" should not be confused with "copy question". If you want to duplicate a question, proceed as described in the “Copy question” section.
Now it may be that you have already set up a question as described in the chapter How do I create an additional question? and would now like to link it to another question. As in the following example with the questions "Which status applies?" and "Date of second vaccination:".

To link the question "Date of second vaccination" with the question "Which status applies? proceed as follows:
Hover (e.g.) over the answer "I have a full vaccination" and click on the action "Add subquestion". In the window that opens, select the question you want to link. In this case "Date of second vaccination". With this selection, the two questions have been linked.
Of course, there is also the possibility that the set up question fits for all your answers (e.g. if the answer type is "Single-select"). You wouldn't want to set up this question more than once.
Please note:
Furthermore, you can use already created questions in the additional forms. That is, if you have activated the switch for setting up a registration form for companions and/or the decline form, you can reuse questions that have already been created by first clicking on "Add entry" and then selecting the desired question in the "Additional question" dropdown. Questions that have already been added are marked with the speech bubble icon in the dropdown.
Change the order of questions
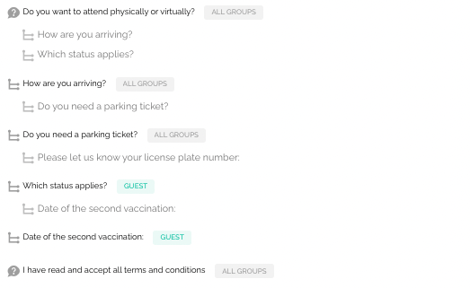
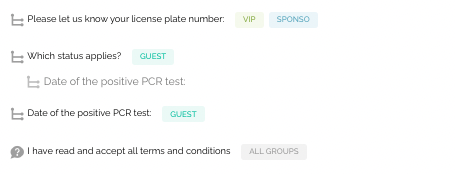
After the questions and subquestions have been created as examples, they look as follows when set up:

The direct subquestions are always listed below the directly assigned question. In the example shown, the subquestion of level 1 ("How are you arriving?", which is displayed to the participant as soon as he/she has answered the main question with "physically") is listed directly below the main question ("Do you want to participate physically or virtually?").
You can move the order of the respective questions and subquestions via drag and drop, with the help of this sign![]() . To do so, move the mouse over the desired question.
. To do so, move the mouse over the desired question.
Website view
In the registration form on your event website, the questions are displayed in the order you defined. That is, the main question(s) will appear first (in the example above, this was the question "Do you want to attend physically or virtually?"). As soon as the participant has selected his/her desired answer here, the question(s) of the first level located directly below will open, then the question(s) of the 2nd level, followed by the questions of level 3, and so on.
Limitation of participant responses
In addition to the answer, you can define a limit for the single and multi select types as to how often this answer can be selected and also receive an overview of how often it has already been clicked.
Please note:
In the case of simultaneous registration from the last limit place of the response, only one contact can complete the registration, the other contact will receive an error message that the registration cannot be completed.
Using the slider under "Show limits" you can define whether the limit is displayed on the website for your participants (slider to the right = the limit is displayed, slider to the left = the limit is not displayed).
Please note:
If you have selected the "Do not display limits" setting, you as the organizer can of course still view the respective numbers in the "RSVP" menu item.
Actions
You want your participants to be automatically assigned to the defined groups? Move the mouse over your newly created answer and click on "Add action" on the right. In the dropdown under Action, the selection "Add to group" is already preselected. Now select your previously defined group in the dropdown under "Add to group".
Conditions
You can use "Display conditions" to link questions, for example. This is a modified option for the subchapter Reuse question.
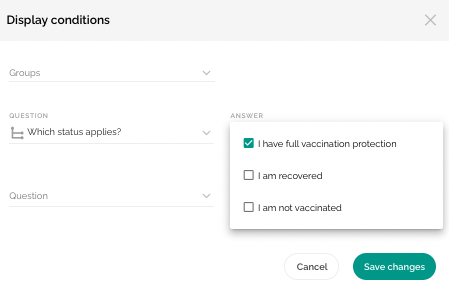
In this way, you can, for example, click on "Display conditions" at the top right of the question "Date of second vaccination" (to take up the example again). Now select on the left side in the dropdown "Additional question" the question with which you want to link your selected question. In this case it is "Which status applies?". In the second step, you can now select one or more answers under which the question should be placed - in this example, the question is assigned to an answer ("I have a full vaccination protection").
Confirm the setting with "Save changes". The questions are now linked.
On the other hand, you can use the "Conditions" function to individually specify for which group this question should be displayed on the website. You can find more information about the group specific registration form in this article.
Move, store or delete information
You want to change the order of the individual contact information and additional question fields? You can arrange the individual fields in your registration form individually using drag and drop. To do this, move the mouse over the desired field. With the help of this symbol on the right side you can move your field.
To finalize your defined information, click on "Save changes" in the upper right corner.
If you want to delete one of the defined fields, click on it. Another click on the trash can icon on the right side will delete the desired mask.

Create multilingual additional questions and subquestions
If you have activated more than one event language in your basic set up, you have to make sure that all your questions, subquestions and answer options are stored in all languages.
You can use the language assistant, which will be shown by this icon ![]() .
.
Use the language switcher in the menu item "Registration" on the top right next to the cogwheel symbol to jump back and forth between your event languages. As soon as you have filled in all fields in all languages, the color of the multilingual symbol will change from red to green.
This way you can check if you have really filled in all content in all languages.
Detailed information about the language switcher and the language assistant can be found in this article.
Please note:
In the registration form in the back office, a maximum of 300 queries can be displayed.