In this article
Preparation
Please note:
To use check-in in the back office, the user must have the role of “Administrator,” “Supporter,” “Event Manager,” or “Check-in.”
Users with the “Check-in” role can only see the check-in in the event back office and cannot make any changes to the event.
If the menu item “Check in” is not yet displayed in your navigation, please activate it in your modules as described here.
Please note:
The activation of the modules is reserved for the roles “Administrator,” “Supporter,” and “Event Manager.” Users with the “Check-in” role must therefore contact a user with these rights if the “Check-in” menu item is not yet activated.

When you open "Check In", your contact list and the search and filter function are displayed on the left-hand side.
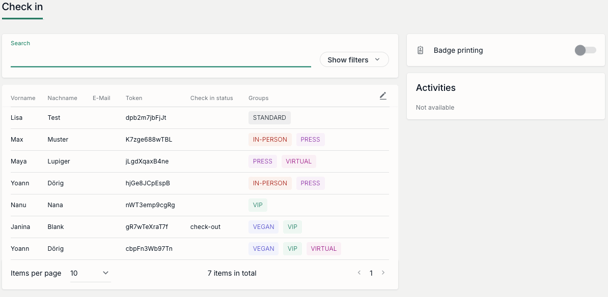
On the right-hand side, you will also see an overview of the activities of all participants, i.e. check-ins and check-outs carried out up to this point.
Please note:
If you open the check-in for the first time, reload your browser window or log out of the tool, the activities will no longer be displayed here in the general overview.
Check in process
To check in a contact, click in the search field, for example, to search for the name or token.
Alternatively, you also have the option of clicking on “Show filter” to display all participants in a specific group or with a specific registration or check-in status, for example.

You can remove these filters at any time or make the window smaller again by clicking on “Hide filters”. The filters remain in place and are still displayed as corresponding tags.

Once you have found your desired contact, click on it. The corresponding contact view field for the participant will now appear on the right-hand side above the “Activities” overview of all participants:
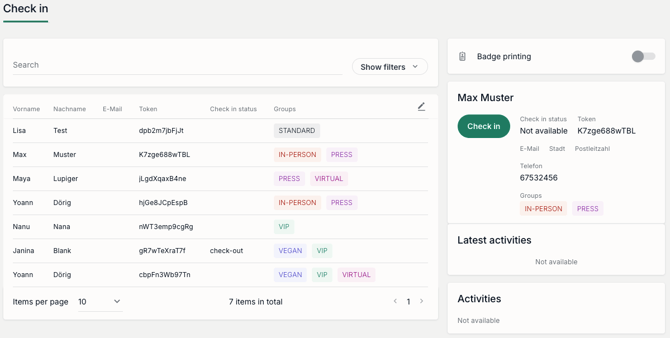
The following information is displayed in this view:
- Name (of the participant)
- "Check-in" button or, if you have already checke- in the contact, this button is automatically changed to "Check-out".
- Check-in status: if no check-in or check-out has taken place yet, the status "Not available" is displayed here. After clicking the "Check-in" or "Check-out" button, the status is adjusted analogously to
 or
or  .
. - Token
- E-mail address (of the participant)
- Groups
- Furthermore, the "most recent activities" of the participant are listed below this information. This should not be confused with the overview of activities of all participants.
If you want to close the check-in window for a contact, click on the “Cancel” button in the top right-hand corner.
If you would now like to check in a contact, click on the “Check in” button. The contact is now marked with the status “checked in” in the personal contact screen as well as in the overall contact list in the “Check in status” column with “check in”.
![]()
At the same time, the check-in is also listed in the participant's activity overview and in the activity list of all contacts.

If you want to check the participant out again, click on the "Check-out" button at the top right of the personal contact screen. The status changes to "checked-out" in the participant view as well as in the column "Check in status". In addition, this adjustment is also adopted in the respective activities:

You can also check a contact in or out several times. For example, click on the "Check in" button again after a "Check out" has already taken place.
If, for example, a participant has not been checked-out but needs to be checked-in again, you can track the new "Check in" again using the "Overwrite check-in" button.

The old log is not deleted. Instead, a second check in status is listed in the participant's personal activity list. This also applies to a second check-out.

Please note:
You can view the final check-ins and check-outs of all participants via the export in the menu item "Contacts".
If you would like to use our badge printing directly from the evenito back office in addition to check-in, please proceed as described in this article.