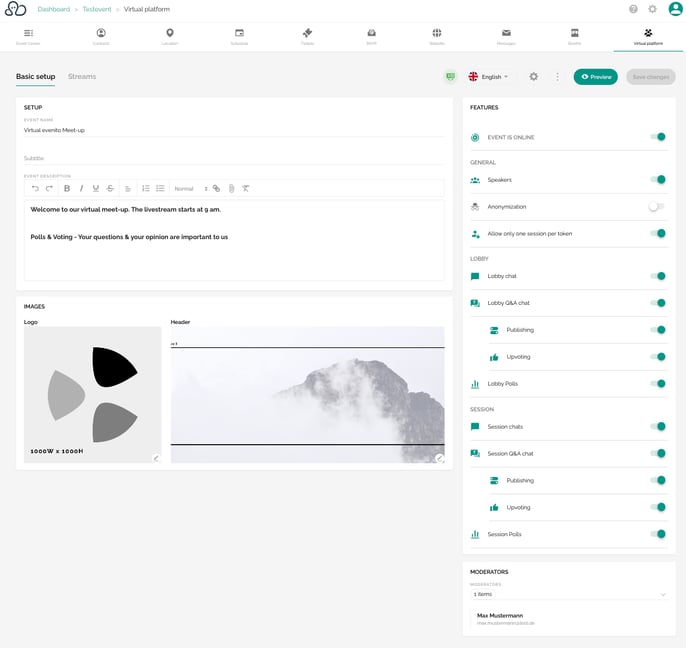
Under the menu item "Virtual platform" you have the possibility to set up the components for evenito connect, as well as to determine the contents and the layout.
In this article
Activate virtual platform function
First activate the function "Virtual platform" on the right hand side under "Features" in the tab Basic setup in the Event Centre. After you have saved your settings, the navigation will be extended by the item "Virtual platform".
Create your virtual platform
Now select the menu item "Virtual platform".

On the left side you define the event name and can add a subtitle and a description.
Please note:
If this description field remains empty, the stored description text from the Basic setup of the Event Centre is taken over.
If you have set up your event in several languages, store the correct translation for each language on the virtual platform. To do this, click on the language switcher at the top right and save the desired content in all corresponding languages.
In addition, you can store your logo and your desired header image here in the "Images" section. To do this, click on the editing pencil of the respective image, load the corresponding graphic(s) into your file manager and select them.
You can find our recommendations and tips on image sizes for the virtual platform here.
Attention!
For security reasons, some content can not be applied and displayed. For example, externally embedded images and fonts are not shown properly.
Colour settings of the virtual platform
You want to customise the look of your virtual platform? Then click on the gear wheel at the top right next to the language switcher.

Here it is now possible to adjust the primary, secondary and the accent colour.
- The primary colour refers to the "Participate/Rewatch" buttons for entering a session or rewatching a schedule item that has already been completed. Your event types defined in the schedule and small details, such as the abbreviations (first letters of the first and last name) of the correspondingly selected participant, are also displayed in this colour.
- The secondary colour adjusts the background colour of the navigation on the left side of the page.
- The accent colour allows you to highlight the "Participate/Rewatch" button on the virtual platform. This button indicates when an event is actively taking place at that moment.
Save your adjustments with "Save & close".
Features
On the right hand side under "Features" you have the option of making further settings for your virtual platform.
- Event is online: If this switch is activated, the virtual platform is accessible for all participants with an active access link and all schedule items and booths that have been set up and displayed can be viewed. In this article, we will show you how deactivating this switch affects your virtual platform.
- Speakers: If this switch is active, a "Speaker" booth is automatically created in the navigation bar on the left hand side of the virtual platform and all the content you have stored under "Speakers" is displayed here.
Please note:
A speaker must be linked to at least one schedule item in order to be displayed on the virtual platform.
- Anonymization: If you activate anonymization, all your participants will be anonymised in their communication that you have activated for this virtual event, meaning they will not appear with their specified or stored contact name. A sequence of numbers is generated which is automatically assigned to each contact (e.g. "Guest 947615").
Attention:
As an administrator, you can also deactivate this setting again during an event. The previously anonymous messages from your participants will then no longer be anonymised and the names of the participants will be visible to everyone.
Please note:
When you export the results of your communication, for example your live poll results, after your event, the names of the individual contacts are visible to you again in the exported Excel list. The participants only appear anonymously on the virtual platform. All interactions can also be assigned to the individual contacts afterwards.
- Allow only one session per token: You have the option to deactivate this switch and thus allow several participants access via the same token at the same time. This way, several people can participate in your virtual event at the same time without needing two separate access links. You can find more information about this feature in this article.
Please note:
In this case, the participants who access your virtual event via the same link all appear under the name that is stored behind the personalised token/link. Please note this for the evaluation of your event data and also if you use the communication options of the virtual platform while deactivating this feature.
- Lobby and session communication: With the help of chats, Q&A's and live polls, you can interact with your participants either at lobby level or at session level, i.e. per schedule item that has been set up and displayed on the virtual platform.
You can activate or deactivate the following options for your virtual event:
- Lobby
- Lobby Chat
- Lobby Q&A Chat (with "Publish" and/or "Upvoting" feature)
- Lobby Polls
- Session
- Session Chat
- Session Q&A Chat (with "Publish" and/or "Upvoting" feature)
- Session Polls
- Lobby
Further information and details on how to use the individual communication options can be found here:
Please note:
You can download the communication that took place in your virtual event as an Excel file via the symbol with the three dots ![]() at the top next to the preview button.
at the top next to the preview button.
- Moderators: If you want to use the communication possibilities on the virtual platform, you have to deposit one or more moderators here who control and monitor the communication and, for example, answer questions or create polls.
In this article, we will show you in detail how you can determine and deposit moderators for your virtual event.
