
In this article:
Overview groups
You can define different groups of participants under "Groups". On the one hand, the groups give you a better overview and on the other hand, you can individualise the following for each group:
- group specific communication
- group specific schedule
- Group-specific registration limits
- group specific RSVP
- Set up individual questions that only certain groups are allowed to see.
- Provide different answer options and add a group to each of them. If the participant selects an answer, this action automatically adds the participant to the group.
A participant can be assigned to several groups.
Define groups
Add a new group using the plus sign at the top right.
![]()
You can save the following settings for each group:
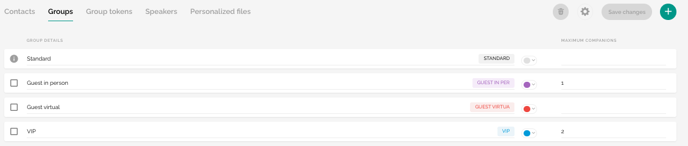
- Name of the group (e.g. VIP)
- Colour code, which serves a better overview
- Companion Limit per main guest per group
- The total registration limit per group
Once you have defined your groups, you can confirm the settings by clicking on the "Save changes" button.
Please note:
If a participant has several groups, the limit of the group that reached its limit first will be applied when registering.
Attention!
For private events, the groups of the main guest that you have defined and assigned in advance when adding or uploading a contact to your backoffice, will also be adopted for the companions.
Create groups by uploading contacts
In addition to setting up the groups manually, it is also possible to have the groups created automatically by uploading the contacts. To do this, simply enter the desired group names in the Excel spreadsheet and assign them to the "Groups" contact field during the upload. If the tool finds unknown groups in the list during this upload, these are created automatically.
The following message is then displayed in evenito:

The newly created groups can then be edited as described in the "Define groups" section.
Delete groups
To delete one or more groups, click on the tile to the left of the group name. As soon as one or more groups have been selected in this way, the trash can icon in the top right-hand corner is activated. The selected groups are deleted by clicking on the trash can.

Attention!
As soon as you click on the bin to delete the selected groups, the deletion takes place directly and without an additional confirmation prompt.
Deleting groups can lead to groupless participants.
Fallback groups
The fallback group is the group to which a participant is automatically assigned if he/she has not been assigned to any other groups yet (e.g. when creating the contact). It is possible to define several fallback groups.
In order to define the fallback group, click on the cogwheel ![]() in the upper right hand corner and select your desired groups in the drop down menu. You can choose from all the groups that you have previously defined in the Groups tab.
in the upper right hand corner and select your desired groups in the drop down menu. You can choose from all the groups that you have previously defined in the Groups tab.
Attention!
The fallback group is marked with the ![]() symbol in the overview. In the following, this group can also no longer be deleted!
symbol in the overview. In the following, this group can also no longer be deleted!
Next step: set and edit contact information