
You can import your contact or participant information into your event by using the Excel import. In this article, we will show you how to optimally prepare your Excel list and explain the possible reasons why you cannot upload your list.
In this article:
Preparation of Excel file
Please note the following before importing
- Allowed formats: XLSX, XLS or CSV
- Your Excel file must not contain any macros and must only consist of one worksheet. If your Excel list contains formatting, we recommend that you import/copy the data without formatting into a new file.
- Each value (first name, last name, e-mail, etc.) must be stored in an individual column in the Excel list.
- The first line should be a title line and not a contact, as it is not transmitted.
- The e-mail addresses must not contain any special characters (e.g. ö, ä, ü) or obvious errors (e.g. no @ sign or a space).
- The language of the participant can be imported with one of the following abbreviations. In this case, the upper and lower case letters are irrelevant:
- German: de, deu or ger
- English: en or eng
- French: fr, fre or fra
- Italian: it or ita
- Spanish: es
- You can also import the group of a contact directly. Please make sure that the group in the Excel file is named exactly as in the tool. If the system does not find a match, a new group is created. If a contact is assigned to several groups, simply separate them with a comma (example: Standard, VIP).
- If you want to import your participants already with a status (registered or declined), this can be done independently of upper and lower case with the following designations:
- Confirmation:
- registered
- confirmed
- angemeldet
- Cancellation:
- declined
- deregistered
- de-registered
- abgemeldet
- Confirmation:
- Multi select fields with several answers can be imported in the same way as groups. Separate the answers with a comma and without spacing (example: Session 1,Session2).
- Currently there are no date or time picker fields available in the registration form. For this reason, please make sure that you format the fields in your Excel file in "Text" format if you want to import a time or date of birth, for example. Otherwise they will be displayed as decimal numbers during the import.
Import Excel

Under Contacts, click on the "+" symbol in the top right hand corner and select "Upload contact list". Either search your computer for the desired list or drag and drop it into the tool.
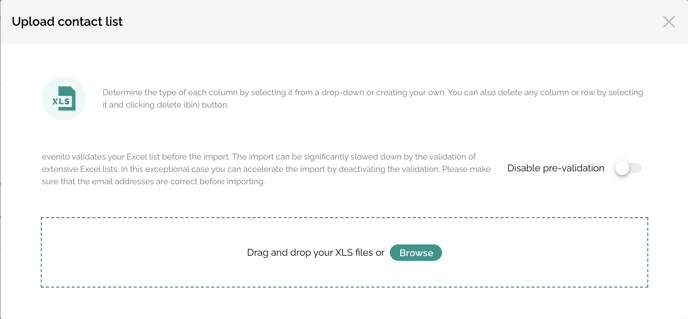
Before the import, evenito validates your Excel list. Validating large Excel lists can significantly slow down the import. By deactivating the validation, your data can be imported faster. In case your computer does not have good computing power, but you want to upload a large amount of data to your evenito backoffice, you have the possibility to activate the button "Disable pre-validation" before your upload. Before importing, please make sure that the e-mail addresses and all other contact data are correct and stored in your Excel list as intended by you in the backoffice.
Please note:
We recommend that you only use this function in exceptional cases. As your data is not checked before uploading. If your Excel list contains format errors in the e-mail addresses, for example, the upload will fail.
Attention!
If you enable the "Deactivate pre-validation" button and you upload contacts in other languages to your backoffice than those that you have defined in your basic setup in the Event Centre, all contacts will automatically receive communication in the set default language for this event, regardless of your assignment in the uploaded Excel list. We therefore don't recommend to upload any other languages than the ones you have defined in your basic setup.
Assign or add new fields
Once you have selected your desired Excel list, all columns/contents will be displayed in the upload window. The tool automatically assigns the contact information fields, provided that the column names correspond exactly to the contact information fields set up in the event.
Contact information fields that have not yet been created in the contact settings are ignored during this process and must still be selected manually for each column in the upload window.
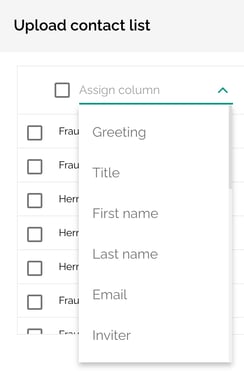
If no suitable name is displayed, you can create a new contact field directly by typing in the field and confirm with enter.
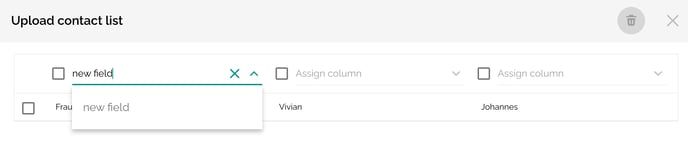
If you want to delete a column or row, select the corresponding column/row and tick the checkbox. Then click on the trash can icon at the top right.
Start import
Click on "Submit" to process the Excel file. The window shows you the status of your contact list. As soon as the import has been completed, you can finalise it by clicking on "Done". The contacts in the Excel list are now visible with the stored information under Contacts.
Information on import difficulties
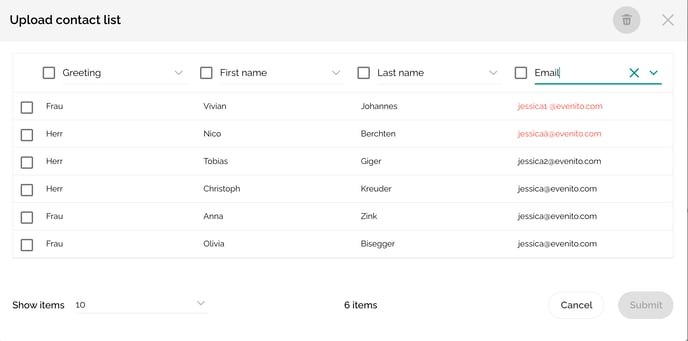
You can't start your import or your import has been loading for a moment without a result? Then the list probably contains an error. Please check the tips under Preparation of Excel file again and also make sure that no contact information fields in your Excel list are highlighted in red. Incorrect data records that the tool cannot import are listed at the beginning of the Excel list.
An example is given below:
To edit the incorrect data records, please move the cursor over the incorrect information (in this example, the email address) and click on the edit pencil that now appears. Correct the data record and then click on the checkmark to apply the adjustment. Do the same with all your contact information fields marked in red.