
Before sending out the invitations or communicating your website link to your contacts make sure you have tested all possible scenarios in your event set up deeply.
In this article, we explain step by step exactly what you need to check and observe in various set-ups in order to test your event before going live.
In this article:
Preparations for testing
To put your event through its paces and run through all possible use cases, a few preparations are necessary.
If you would like to test a ticketing event, please proceed as described in this article.
Attention!
If your event is set up in multiple languages, check everything in every event language you have defined.
Check Basic setup and event limits
Check the following contents in the "Basic setup" tab in the Event Center:
- Name of the event, event description, date and time (zone), languages

Please note:
This information can also be displayed on the event website in the header module and is transferred to the calendar entry if the evenito placeholder is used in the messages or the button for downloading the calendar entry is active on the website.
Then check the limits of your event in the "Limits" tab:
- Total limit of your event
- Companion limit (total limit and/or group-specific limits)
- Group-specific registration limits

Check RSVP
Please note:
To be able to use the registration form, the website module "RSVP" must be added to one or more event websites in evenito. To do this, the "Website" module must be activated in the Basic settings in the Event Centre of your event.
Please check all settings in the RSVP as well as the structure and content of all your forms.
Settings of the registration form:
- Are all system notifications stored as you want and need them?
- Are the time periods deliberately activated and dated?
- Does your event have the correct registration type (open or private)?
- Are all required forms activated?

Contact information and questions on the registration form:
- Do the questions and sub-questions have the desired order?
- Are all contact fields and questions correctly marked as "Required", "Read only" or "Optional"?
Attention!
Only declare a contact information field as a "read-only" field if you have already stored this data for each participant in the event in advance.
The contact information fields should therefore not be "read-only" fields if your event is an "open" event or if you want to enable registration via group tokens.
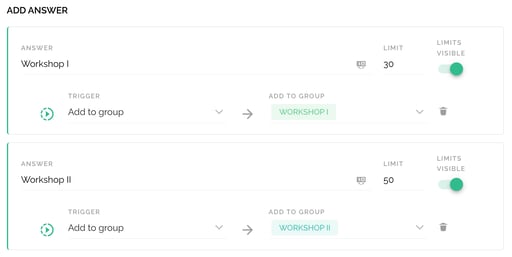
- Are all the limits for the individual answer options stored correctly?
- Are all group assignments for the individual answer options correct?

- Are all the conditions of your questions/sub-questions set correctly?
- Check whether all questions have the correct group assignment if you have set up your RSVP for specific groups.
- Check whether the RSVP for your companion is set up accordingly, if you allow the registration of companions in your events.
- If you reuse the main guest's questions for the companions, make sure that the main guest and the companions have access to the same answer limit (if you have limited the answers).
Go live website
To go through the whole process once, please publish your website as described in this article by clicking on the "Publish" button.

If you would like to change the name of your website or domain in advance, you can do so in the website settings.
If you have created several event websites, it is initially sufficient to only activate the website with the "RSVP" module for testing purposes. However, we recommend that you make all the required websites live so that you can check all possible links or redirects.
Please note:
If you use the placeholders [[event.register]] or [[event.personalsite]] in your messages, these link to the declared default website. The "RSVP" module must therefore be included on the default website.
Check message settings and placeholders
Check the entire content of your messages and pay particular attention to the following points:
- Content of your messages: In addition to your text, images and design, check any placeholders or links you have placed.
- Message types: If automatic registration confirmations and deregistration confirmations are to be sent, please ensure that these messages are assigned to the corresponding message types.
- Message settings: Make a final check of your sender settings. Also pay attention to the subject line or any placeholders used in CC or BCC.
- Group assignment: Check whether all messages have the required and correct group assignments.

Attention!
If you are sending automatic registration and deregistration confirmations in which you want to display the QR code or the access link to the virtual platform (evenito connect), make sure to use all the correct placeholders and links when testing.
Test a closed event
A closed event in evenito means that your registration form is token-protected and can only be opened with a personal or group token.
If you only communicate the general link to your website to your participants, they will first see the token input box in the RSVP. The form will only open after a personal or group token has been entered.

If you invite your contacts directly from evenito by e-mail and use one of the placeholders [[event.register]] or [[event.personalsite]] in the e-mail, the participants will not see this box, but will land directly on the personal registration form, as the token is already included in the link.
Invite contacts via evenito message (invite directly from evenito)
Create test contact
First create yourself as a test contact by proceeding as described in this article.
If your registration form is set up for specific groups and/or your event is multilingual, you should create several test contacts with the respective group assignments and languages so that you can test the registration process from all possible perspectives. You can also store your test contacts in the event via Excel upload, as described in this article.
Send invitation to test contact(s)
Now go back to the messages to trigger the sending of your created invitation.
For the test, you can simply send yourself a test message as described in this article. However, we recommend that you also trigger a real dispatch.
Attention!
Include a note in your messages that it is a personalised message that should not be forwarded.
Otherwise, if your participants forward their personalised messages, this can lead to participant data records being overwritten and you having to spend a lot of time manually restoring this data.
Check website and fill out registration form
As soon as you have received the message in your inbox, first check that everything is displayed as desired and that all links are working and forwarding correctly. You can then click on the button or link to redirect to your website.
The first thing to check here is whether the registration form is displayed in a personalised form and whether all the data you have previously entered into the tool and selected for the registration form is displayed.
Check additionally:
- The content including any links, downloads, videos or redirects on your website.
- The text of the welcome box (if activated).
- If the RSVP was set up for a specific group: Do I only see the contact fields/questions for my registered group?
Complete the registration form (and the companion form if applicable) and send the registration.
Now check the system notifications that are displayed after successful registration or deregistration and all messages received, if these are sent automatically after an action on the website.
Invite contacts via group token (link) (invite externally)
If you would like to send a website link for registration either exclusively or in addition to the personalised invitation mailing, please proceed as follows:
- Create all required groups and group tokens as described in this article and limit them accordingly, if necessary.
- You can now either communicate the website link plus the corresponding group token or insert the token directly into the link.
Example:
In this example, let's assume that the group token is "sponsor1".
Then compose the link in your message as follows:
Event link plus /?t= plus group token
Example: https://evenitoconference.evenito.site/?t=sponsor1
Hint:
You can also place the website link (including the group token if applicable) after a QR code to direct contacts to your website with the registration form.
Now open the website with your group token and first check whether the registration form is displayed correctly.
Also check this:
- The content, including any links, downloads, videos or redirects on your website.
- The text of the welcome box (if activated).
Complete the registration form (and the companion form if applicable) and send the registration.
Now check the system notifications that are displayed after successful registration or deregistration and all messages received, if these are sent automatically after an action on the website.
Please note:
If a participant opens the website with a group token, the "decline" button is not available to this participant.
Only participants who are already registered in the event and have received a personalised invitation link have the option to unsubscribe.
Test open event set-up
If your event is open and anyone who receives the website link can register for your event, proceed as follows to test it:
- Paste the entire URL of your event website into the browser
- Fill in the open registration form with your details and check the system notification and receipt of the registration confirmation, if this is sent automatically.
Hint:
You can also invite additional contacts in an open event set-up using a personalised invitation or group token. Please note that this may result in duplicate contacts if someone registers via their personalised invitation and also via an open website link.
Please note:
If a participant opens the regular website, the "decline" button is not available to this participant.
Only participants who are already registered for the event and have received a personalised invitation link will be able to unsubscribe.
View test contacts in the back office
After you have completed one or more tests for the registration process, the following data will appear for you to view and edit in the evenito back office:
- The Event Center gives you an initial overview of your contacts. Here you can see at a glance how many participants are already in the event and have registered or cancelled. You can find more information on this in this article.
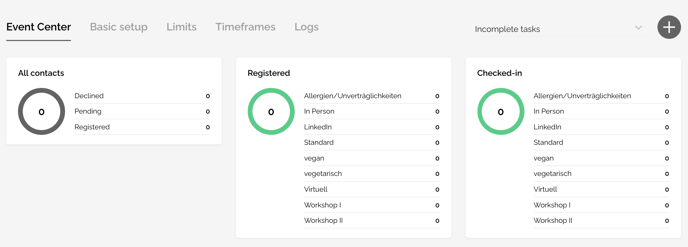
- In the Contacts menu item, all participant data including the login status is displayed in the overview. You can organise the layout of the overview yourself by proceeding as described in this section.
You can use the filters to control which contacts are displayed in the overview, e.g. to export them.
If you want to view the contact details or relationships of a contact, proceed as described in this article. If you want to find out exactly what has happened in a contact data record, you can call up the contact's logs.
- If you have set up questions in the RSVP tab for which you have set a limit on the answers, you can see the extent to which the respective limit has been utilised by the answers already given after opening the respective additional question.
- In the Analytics of your messages, you have the option of checking the dispatch of the respective messages. The sending statistics show you the status of the messages sent. If a participant has the status "unsubscribed", you should check the blocklist in the Space settings. You can find more information on the sending statistics and the meaning of the different statuses in this article.
